1. Getting Started
Installation
Download the Waveform installer from the Download Page. Alternatively you can also download as a zip archive instead, so you can self extract to where you prefer.
Note: Throughout these tutorials we will be referring to the
SamplesandTutorialsfolders. For the default installation, these are located insideC:\Program Files\Waveform\Waveform\. Shortcuts to those folders will also be added to your Start Menu inside theWaveformfolder.
Licensing
On opening Waveform for the first time, you will be presented with a dialog where you can choose the type of licence you would like:
| Trial | This will begin a 30 day trial, giving you time to try out the software before you buy |
| Buy | This button will navigate to PayPal in a new browser window. Once paid for, your licence key will then be sent to the email address you specified |
| Activate | Enter your email address and licence key here. These will then be verified online before successful activation of your product |
Auto Updates
In the startup dialog you can also specify to check for updates on startup. It is recommended you leave this on, so you recieve bug fixes and new features as soon as they are available. When an update is available, you will be presented with a dialog containing the release notes, and can choose then whether to download and apply the update or not.
The User Interface
To familiarise ourselves with the UI, we will first open an existing sample project. Click on File -> Open Project and open the Samples\Helicopter\helicopter.wfxml project file.
Workspace Explorer
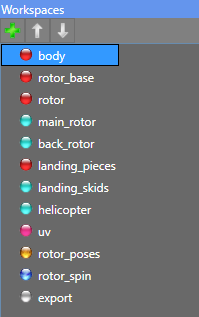
This explorer exists in the middle of the UI, and lists all the items in the project. Each icon denotes a different type of workspace item:
| Icon | Type |
|---|---|
 |
Pattern |
 |
Compose |
 |
UV |
 |
Animation Pose |
 |
Animation Clip |
 |
Export |
To begin, lets click on the helicopter item to view it's contents.
The Editor
You should now something like this in the editor:

If you select one of the blocks, the helicopter model will be generated and appear in the 3D View.
Everything in Waveform is made up of blocks, which can be attached together in different ways to produce different behaviours. The blocks define the rules which are used to generate the 3d model that appears in the 3d View. We will be going over the editor in more detail in the rest of the tutorials, so for now just understand that this is where all the work takes place.
The Error List

When you make invalid changes in the editor, Waveform will try to tell you what went wrong here. For now this list is empty, but this is the first port of call when things aren't working as expected. Selecting an item here will also take you to the offending block.
The 3d view
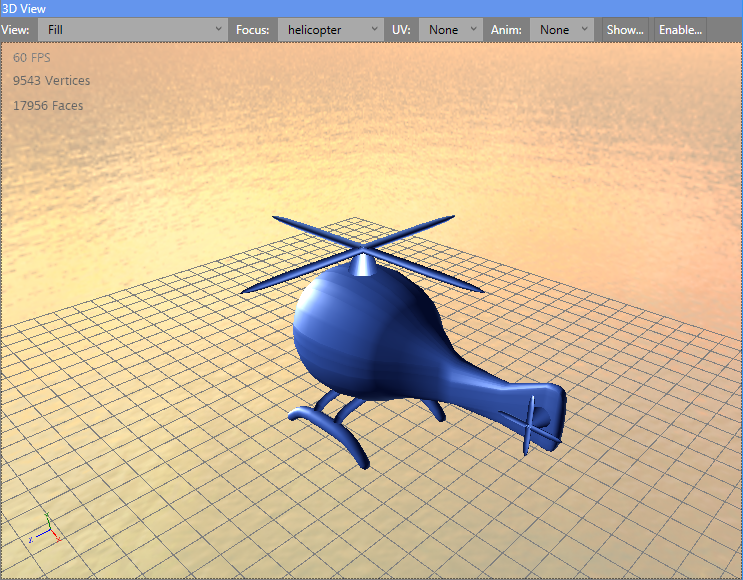
This displays the generated 3d model for the currently selected block. The camera controls are as follows:
| Control | Action |
|---|---|
| Right-click + Drag | Use this to rotate the camera around the origin |
| Shift + Right-Click + Drag | Use this to move the origin, panning the camera |
The top left corner shows the vertex and face counts. Generally the lower the better with these last values, though too low and you risk having very blocky models!
Lets go through the rest of the toolbar:
View

Use this to change how the model displays. Some modes are better depending on what you are working on:
| View | Description |
|---|---|
| Fill and Contours | This view will show the Quads and NGons for the model, and can be thought of as a simplified view. The fill is drawn in a single block colour |
| Contours Only | Useful for inspecting the model without the fill |
| Fill | The fill only |
| Wireframe | The wireframe only. This is is the triangulated result |
| Fill and Wireframe | Fill with the wireframe on top |
| Textured | The model with the selected UV Layout block applied |
| Textured and PhysicsBodies | The textured model, with the physics bodies shown also in wireframe |
| PhysicsBodies | Shows the location and shape of the rigid bodies |
| PhysicsBodies and Wireframe | Shows the rigid bodies, as well as with the wireframe of the model. Useful for inspecting the model during physics simulations |
| UV Map | Inspect the generated UV map of the selected UV Layout |
| UV Map and Wireframe | Inspect the generated UV map of the selected UV Layout |
Focus

Here we can specify to display something other than the selected block. This is useful when you want to keep the final model on screen, but edit another part of it in the editor.
UV

The selected UV. Try changing this to uv, and changing the view to textured to see it. Now we see the model with the texture applied.
Anim
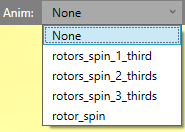
Here we can select an animation to play. Try selecting the rotor_spin animation to see it in action.
Show...

| Grid | Controls whether the grid is visible or not. |
| Bones | Turn this on to see the rig of the model. We'll go over this more in the Animation tutorial. |
| UV | Shows the seams. We'll go over this more in the Materials tutorial. |
| Skybox | Toggles showing the skybox or not. |
Enable...
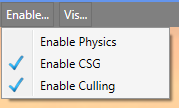
| Physics | Try turning this on. You will see the ragdoll activates and the helicopter falls to the floor. You can also click and drag the model with the left mouse button. We will go over this in more detail in the Physics tutorial. |
| Boolean Operations | A more advanced option we'll get into later. Note though this can be turned off when performance is an issue, while editing the model. |
| Culling | Usually in a game engine, the insides of a model aren't drawn to save time, in other words they are culled. Turn this off when you want to see the inside of a model. |
Vis...
This menu is gone over in the Visualisation tutorial.
Saving
The editor will start a new session when you open a project, which will store all changes you make in the _activeSession_ folder inside your project folder. Use Ctrl + S to save those changes permanently at at any time, or File -> Save project. Additionally any changes made in the editor will be autosaved after 5 seconds.
Any unsaved sessions will be moved to the _unsavedSessions_ folder, as a backup in case you did mean to save the session. To restore a backup file, close Waveform and then copy it over the original file. Waveform will pick up on the change the next time you re-open the project.


